
Plasmid purification is a fundamental technique in molecular biology, enabling researchers to efficiently isolate plasmid DNA from bacterial cells. A plasmid is a small, circular, double-stranded DNA molecule that acts as a vector and carries specific DNA fragments. When introduced into a host organism, plasmids replicate independently, producing multiple copies of the DNA fragment being studied. This ability makes plasmids invaluable for research in cloning, gene expression and protein production.
In this guide we will explore one generalized, step-by-step protocol for plasmid purification. In addition, we will discuss methods of assessment quantity and quality of plasmid DNAalong with variations to accommodate different plasmid sizes, bacterial culture volumes, and experimental goals.
Overview of plasmid purification
Plasmid purification involves isolating plasmid DNA from bacterial chromosomes, ribosomes, proteins and cell membranes. Despite the variety of commercial kits available, the underlying principles remain consistent:
-
Cultivate the bacterial culture containing the plasmid of interest.
-
Harvest and lyse the bacteria to release plasmid DNA.
-
Purify plasmid DNA using silica columns, buffers and elution techniques.
The process requires careful handling to prevent contamination and ensure high-quality DNA for downstream applications, such as cloning, transfection and protein expression.
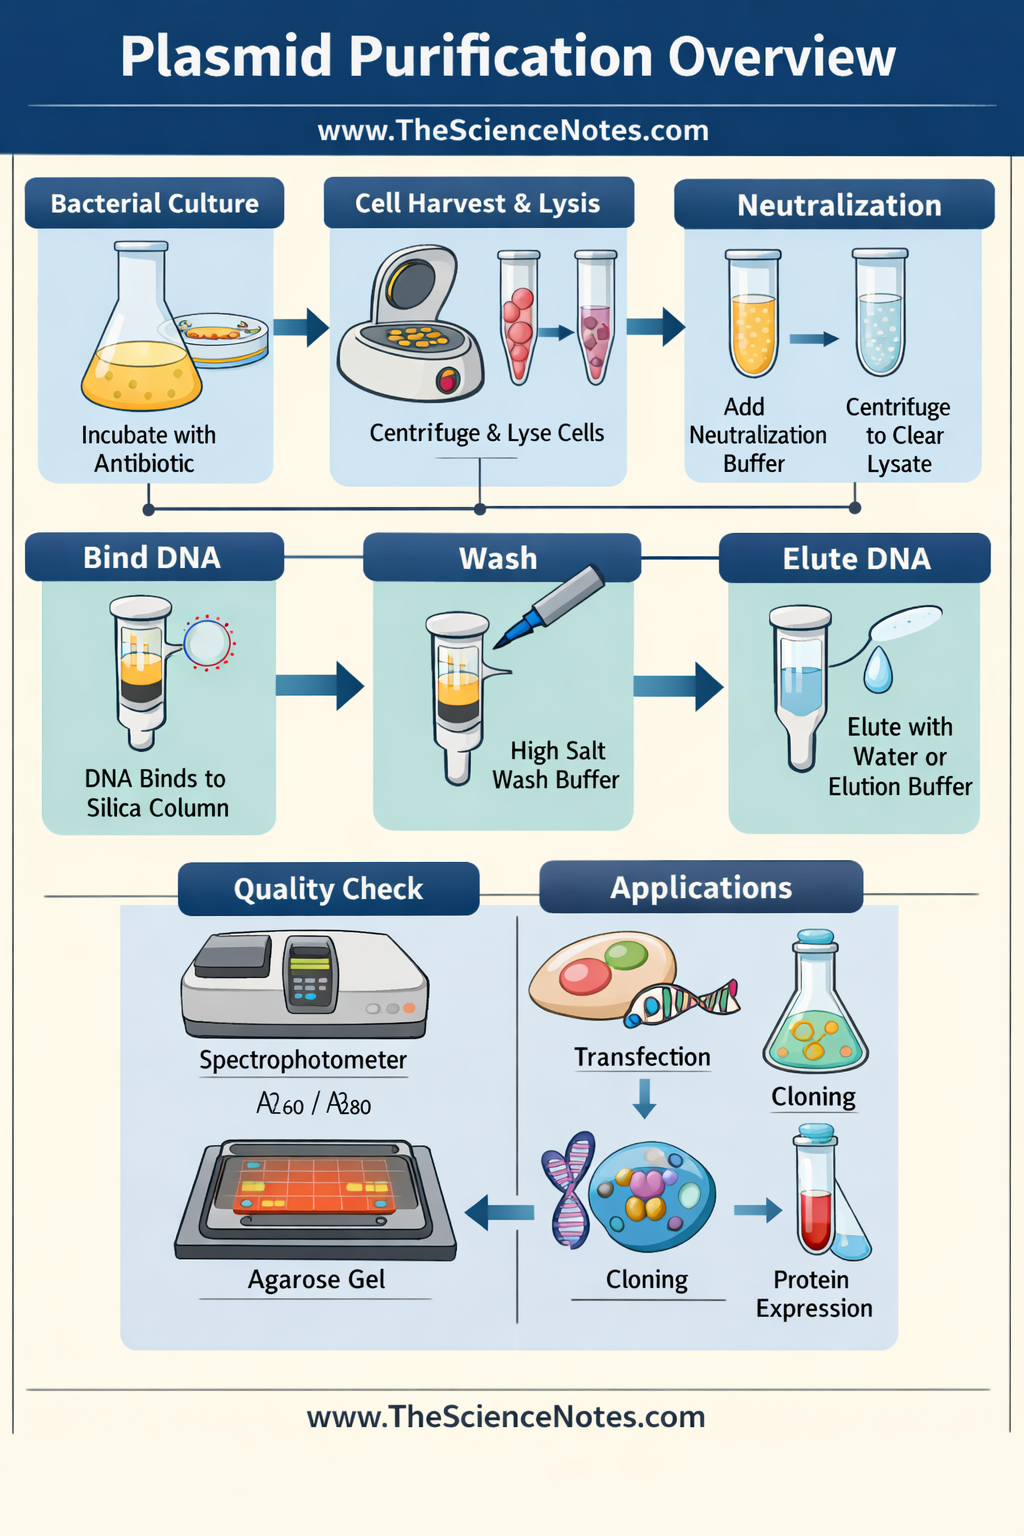
Step 1: Bacterial culture growth
The first step in plasmid purification is to grow a bacterial culture transformed with the plasmid of interest. Most plasmids carry one antibiotic resistance genewhich allows only transformed bacteria to survive in culture media containing the specific antibiotic.
Procedure:
-
Select a single bacterial colony containing the desired plasmid.
-
Inoculate it into a suitable growth medium with the corresponding antibiotic.
-
Incubate overnight at 37°C in a shaking incubator to ensure robust bacterial growth and plasmid replication.
Tip: Growing the culture overnight ensures sufficient bacterial density for high plasmid yield.
Step 2: Harvesting and Lysing Bacteria
Once the bacterial culture has grown, the cells must be harvested and lysed to release the plasmid DNA.
Harvest:
-
Centrifuge the bacterial culture to pellet the cells.
-
Carefully remove the supernatant, leaving the bacterial pellet behind.
Bright:
-
Resuspend the pellet in a lysis buffer containing detergents, such as sodium dodecyl sulfate (SDS). This buffer disrupts bacterial membranes, releasing plasmid DNA and other cellular components.
-
Avoid vigorous vortexing to prevent cutting of genomic DNAwhich may contaminate your plasmid preparation.
-
The solution may initially seem unclear, but will become clear as the lysis continues.
Neutralization:
-
Add a neutralization buffer to restore the pH.
-
This step precipitates genomic DNA and protein complexes while leaving plasmid DNA in solution.
-
Mix gently to prevent contamination of the plasmid fraction.
Centrifugation:
-
Centrifuge the lysate to pellet genomic DNA and protein residues.
-
The supernatant, which contains plasmid DNA, is collected for purification.
Step 3: Plasmid DNA purification
After lysis, plasmid DNA must be separated from remaining contaminants using a silica column.
Column binding:
-
Transfer the clarified supernatant to a silica column.
-
DNA binds to the column through a anion exchange mechanismwhere negatively charged DNA interacts with the column via cationic salt bridges.
Washing:
-
Wash the column with high salt buffers to remove proteins, RNA, dyes and other low molecular weight impurities.
-
Discard the flow-through after each wash.
-
Make sure the column is completely dry before elution to avoid contamination.
Elution:
-
Elute plasmid DNA using sterile water or a low salt elution buffer.
-
At this point, the plasmid DNA is ready for immediate use in downstream applications.
Step 4: Assess plasmid quality
Verification of plasmid purity is essential for reliable results in molecular biology experiments. Two common methods include:
-
Spectrophotometry:
-
Measure the absorbance at 260 nm and 280 nm.
-
The ratio of A260/A280 indicates DNA purity, with values around 1.8 considered pure.
-
-
Agarose gel electrophoresis:
These checks ensure that your plasmid is suitable for cloning, protein expression or transfection experiments.
Step 5: Variations in Plasmid Preparation
Plasmid purification can be adapted depending on plasmid size, copy number and desired yield. Preparations are often classified as:
-
Miniprep: Small scale, low yield (~5–50 µg).
-
Midiprep: Medium scale (~100–350 µg).
-
Maxiprep: Large scale (~1–2 mg).
-
Megaprep: Very large scale (~10 mg).
Selection of the appropriate preparation depends on the downstream application and experimental needs.
Applications of purified plasmid DNA
Purified plasmids are essential in many areas within molecular biology and biotechnology:
-
Transfection:
-
Protein expression:
-
Cloning and genetic manipulation:
-
Plasmids serve as vectors for the cloning and study of genes.
-
Multiple plasmids can be co-transformed to reproduce biosynthetic pathways for complex molecule production.
-
-
Structural Biology:
Security considerations
Plasmid purification requires careful handling:
-
Always use one lab coat, gloves and goggles.
-
Use proper disposal methods for bacterial cultures and buffers.
-
Avoid aerosol formation during lysis and pipetting.
Conclusion
Plasmid purification is a cornerstone technique in molecular biology, enabling researchers to efficiently isolate, manipulate and study specific DNA fragments. By following the steps outlined—bacterial culture growth, lysis, DNA purification and quality assessment-students and researchers can obtain high-quality plasmid DNA suitable for a wide range of applications, from cloning to protein expression.
With practice, plasmid purification becomes a simple, reliable method that supports advanced experiments, incl transfection, protein production and synthetic biology. Using the right techniques and safeguards ensures reproducibility and protects both the researcher and the integrity of the DNA.


